
Making and using compost all to the exclusion of all chemical fertilizers is not new. Long time gardeners highly recommend using composts and organic matter in the garden.
For thousands of years the Chinese, Japanese, Indians, and the people of many European nations all made and used composts.
Using compost in the garden or on the lawn is not without controversy. Some advocates of organic gardening claim any use of commercial fertilizers will harm the soil.
However, when organic matter from the composting process in any form gets combined with commercial fertilizers, the yields are usually greater than when either material is used alone.
When properly used commercial fertilizers prove beneficial, not detrimental, to garden soils and crops. The actual results obtained from any soil treatment, however, vary considerably depending on:
- Soil Structure
- Water-holding capacity
- Seasonal conditions
- Crop grown
Always do a soil analysis so that you will know the actual fertility level of the soil. You will know what soil amendments and in what amounts will benefit the crops grown.
Compost decomposes most rapidly and benefits the soil most when a mixture of finely ground limestone and fertilizer chemicals supplying available nitrogen and phosphorus mix with the composting materials, especially when compost manure is not available.

Using Compost Benefits The Soil And Environment
For hundreds and even thousands of years, gardeners have been creating their compost application by piling organic yard waste – weeds, coffee grounds, leaves, grass clippings, manures – in heaps, to decompose into soil-enriching compost.
In a compost bin or heap, dead materials become transformed into substances that nourish new life. Compost increases the fertility of the soil, introduces beneficial microbes and improves its physical soil structure.
As a soil amendment adding compost to clay soil helps loosen hard-packed clays, binds sandy soil, aids water retention, and releases major and minor nutrients to plant roots. No other substance has so many beneficial effects on the chemical, physical and biological properties of the soil.
Garden compost, is a basic tool for building fertile soil and thus for growing quality plants. Made and used properly, it is excellent for everything from sowing seeds to feeding trees.
Composting For Soil Improvement
A long time friend Ron W shared his experience with adding compost to his growing routine.
“Finished” compost from the pile has many purposes in the garden. For flower beds, I use four parts soil from the compost pile and one part unscreened leaf compost.
For outdoor potting soils, I use screened material from both heaps, half, and half plus a little sand. For improving garden soil I use leaf compost, applying it steadily year by year in the Fall and digging it in. In this way, a poor soil derived from gray mud shale has been completely transformed.”
Compost and Fertilizer
There are those who say composted material contains everything necessary for the growth of plants.
Ron W shares this perspective…
“Much as I depend upon my yearly harvest of compost, I would not care to garden with compost alone. I use fertilizer applications over all my garden, regardless of the amount of compost used.
I find that organic material in compost improves the soil, making it more friable and, at the same time, more retentive of water.
Compost stimulates the activities of beneficial soil bacteria, provides some plant food and establishes healthy growing conditions under which plants can make more use of extra plant food supplied by fertilizer. Compost and fertilizer work together. Neither does its best work alone.”
How To Make Good Compost
In times past homeowners would burn their leaves, grass clippings, weeds, and small prunings and destroy valuable soil material. Organic material that improved soil structure and added fertilizer to the soil too. Material for helping aerate a heavy clay soil or assist sandy soil in retaining much-needed moisture.
Good Soil And Good Compost Full Of Life!
Do you think of soil as being something inactive and lifeless? Poor soil may be near death, but good soil is teeming with untold numbers of active and very much alive microorganisms.
Treat soils, like plants, like living things. A close relationship exists between the amount of life in the soil and its fertility on which productivity depends.
Forests continue to thrive for ages because each year the falling refuse collects to gradually decay and enrich the soil. We use this same principle by making compost from our waste materials and applying it to our gardens each year. The waste materials convert into a rich, dark, crumbly substance that can give new life to worn out soils. Even good soils need renewing.
There are dozens of ways of composting these waste materials. Some are simple to follow, and others are quite lengthy and complex. Busy gardeners will probably prefer the simpler methods.
Two Easy Composting Methods
These two easy methods for composting honestly, should not be termed “making compost.”
Both methods improve on the burning or destroying of a valuable material or having it hauled away to the local landfill.
The first uses nature’s way. This method allows leaves to fall between the shrubs and perennials. Then remove the materials from the lawn or paths to places where the soil needs enriching.
This could include grass clippings and weeds. It is more mulching than composting but this material in time by works of insects and bacteria along with the help of rain enriches the soil.
The second method throws everything into a pile:
- Grass clippings
- Leaves
- Weeds
- Small prunings
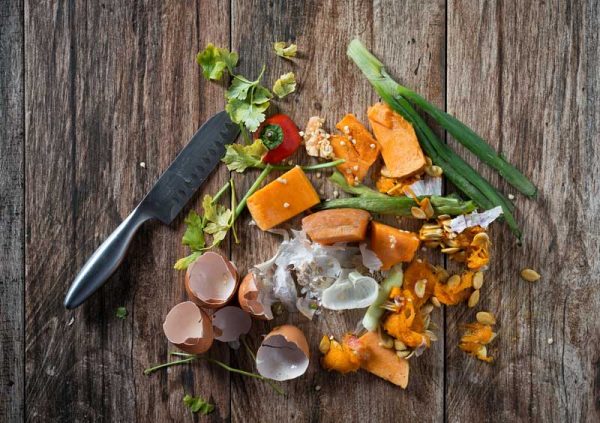
- Kitchen waste consisting of food scraps vegetable peelings as it accumulates.
Slowly it would decay but sprinkling the soil with water and turning the material occasionally will improve the speed of decay. But with time and effort, you can get better results with less haphazard methods.
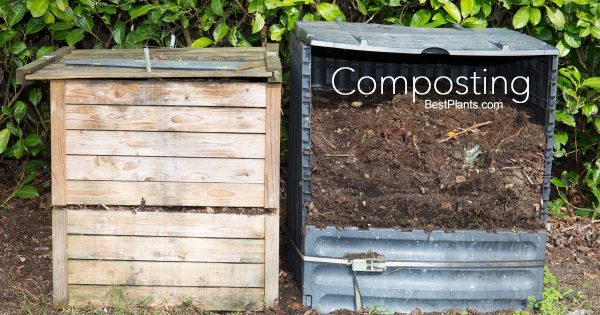
Where To Build Your Compost Bin
Now we get to the serious side of composting which begins with a compost bin or pile.
When choosing a location for your compost pile, use these guidelines:
- Near a water supply
- Screen it from view as much as possible
- Protect it with a hedge, trellis, or wall on three sides
- Place in a well-drained area – not near the bottom of a slope where water might collect during prolonged rainfall.
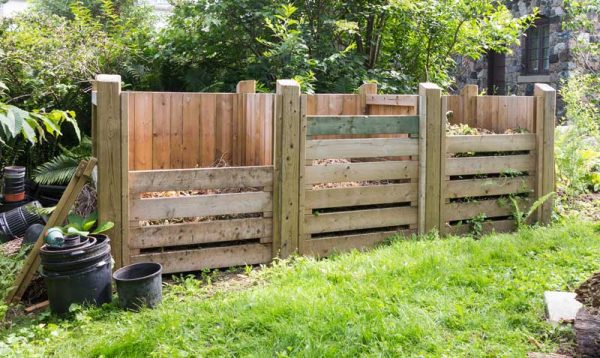
For backyard composting serious gardeners construct more permanent compost bins or fenced enclosures for composting.
For the sake of convenience, make it so you can open one side to turn the pile and get at the finished material. Snow fencing works well with four posts in the ground at each corner.
Other suggestions include:
- Using cement blocks or bricks laid to permit air to enter
- Chicken wire with posts to make a square, rectangular or round container
- Rough stone where available
- Logs making enclosures inconspicuous in the garden
When soil is necessary to add to the compost layers, dig a pit or hole in a well-drained location. This part of the heap is lower than the soil surface. Use the dug out soil in constructing the compost pile.
The size of the compost heap depends on space available and the amount of material at hand to use. It should probably be no smaller than five feet square but preferably larger.
For best results, five feet high is about the maximum regardless of width and length. If there is space, it is a good idea to have at least two piles. One ready to use and the other in the “decaying process.”
Also, make a space near the pile to collect the green materials as they accumulate. This future “green composting material” should wither some before being used. You also need enough on hand to build the heap all at one time.
What Are The “Green Garden Materials”?
By green materials we are talking about plant refuse:
- Weeds
- Grass clippings
- Discarded vegetables of vegetable waste from the kitchen
- Dead foliage
- Hay
- Straw
- Corn stalks
Just about any vegetable scraps that will decay.
The use of the word “green” does not refer to color.
The Art Of Building The Compost Pile
If the location of the compost heap is on hard soil, spade it first to provide good drainage. Place a layer of green material six to ten inches high on the ground. The looser this material is, the thicker the layer can be.
If there is compost on hand, sprinkle a thin layer on the green layer. It will contain the soil organisms that help tear down the composting materials.
If you sift the finished compost recycle the coarse siftings for building these layers. Add a layer of fertilizer and a sprinkling of agricultural lime or wood ashes. Then a layer of soil enough to make about two inches of the materials above the green layer.
When using very dry composting material, water each layer as you add the layer to the heap. The bacteria that does the work requires ample moisture, but the bacteria also requires air.
The composting pile should not be waterlogged.
It should be soft and fluffy but have all the moisture it can hold without any of it running out of the bottom of the heap.
Add another layer of green material and then another layer of the fertilizer, soil, lime, and compost if any of the latter is at hand.
Alternate the layers to make the desired height, sloping the sides gradually to make the heap somewhat smaller at the top than at the bottom. Leave a depression at the top to hold water when it rains.
Microgreens: What It Is and How to Grow 42 Microgreen Varieties
Use a hose to add water if the heap drys out between showers. Cover the top and sides with a six-inch straw mulch to prevent the heap from drying out during hot, dry windy weather.
Turning the pile in three weeks speeds up decomposition. Fork over the material, so the outside of the pile moves toward the center. This benefits the material of the stronger heating and decaying action in the center of the heap.
Turning the heap will disorder the layers, and this is all right. Turning again in five weeks will be beneficial. Over a four to 6 month period, the pile should decay and be ready to use.
If weather or specific conditions do not permit turning when the exact date arrives, there will be no harm done. In fact, you will discover lots of opinions on the matter of timing.
Some say to turn the pile every two months except during the winter. Others recommend one turning at the end of three months. A gardener must through experience find out which method works best for him.
The high heat generated in the fermenting process usually kills any weed seeds. There should be no disagreeable odor. If there is, it means that the wrong kind of decomposition is taking place.
- Forking it over and adding agricultural lime usually corrects this.
- A heap that does not have enough nitrogen will decay very slowly.
Adding fertilizer, rich soil, or compost will quicken the decaying process. A heap that is too soggy will smother the air-loving organisms yet if it is too dry, these organisms cannot work.
Make holes in the pile to permit air to enter. A black plastic sheet helps to keep the heap from drying out too rapidly. This also prevents the pile from getting too wet during rainy weather.
Shredding or grinding the green materials shortens the process of turning the heap into rich, crumbly dark humus. Break up or shred material such as corn stalks. Even leaves decay faster if shredded.
As the heap heats up, it starts shrinking in size. The heaps are made in layers, so the use of ingredients is in somewhat correct proportions and mixed evenly throughout the heap.
Tips on Composting The Row And Sheet Methods
There are lots of tricks to speed up the home gardener’s composting process. Making compost is no longer the tedious job it once was.
One of several time-saving methods makes compost right in the garden by the “row” or “sheet” process eliminating the compost bin with its hauling and heaving.
If left to her own devices, nature uses this row or sheet method herself, but scientific help can speed it up.
Row Composting
In row composting, make shallow or deep trenches between rows in the vegetable garden or anywhere plants grow in rows!.
Regularly till the trenches progressively, during the season, from one end to the other, with any or all organic wastes:
- Non-oily and fat-free garbage
- Leaves, yard waste, sod and grass clippings
- Coffee grounds
- Seed-free weeds
- Sludge
- Sawdust
- Barn manure
- Brewery waste
- Mushroom compost
- Just about any kind of animal or vegetable food waste available
Treat this material with one of the activators like this available on the market and add some commercial fertilizer or nitrate, then cover lightly with soil.
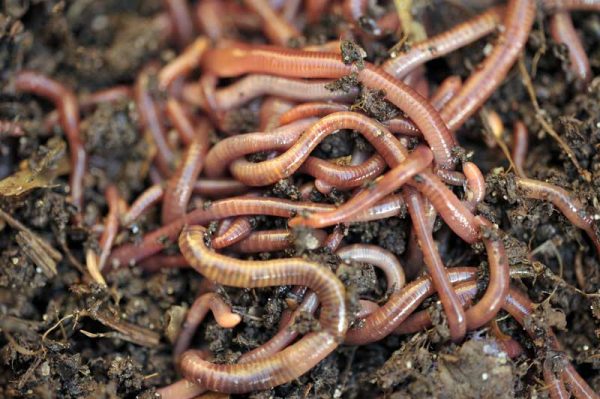
Nature’s minute soil life and earthworms do the rest. For many, the compost heap doubles as a worm bin.
The addition of commercial fertilizer or nitrate primarily helps speed up decay and serves as fuel for the bacteria. The more fuel you feed the bacteria, the faster they “burn-up” the waste converting it into humus. And, the nutrient value of the fertilizer remains in the soil.
This, undoubtedly, is a better way to use fertilizer than applying it directly because bacterial action converts it to a form that will not upset Nature’s balance of microorganisms on “biological” substances providing you use it in reasonable quantities.
Manufacturers give directions for using chemical fertilizer as activators in a customary way:
- Estimate the amount of compost you add to the garden
- Sprinkle 2 to 4 pounds of nitrate or complete mixed fertilizer for each 100 pounds of compost material.
11 Strange Things That Will Improve Your Soil
Sheet Composting
Sheet composting is a little different. In this method, spread or broadcast the compost like mulch is over the garden area. The depth of the material should be about from 1 to 6 inches. By the way, compost makes a fine mulch.
Treat it with an activator or the complete fertilizer or nitrate and then disc, roto till or dig it in by hand so that some of the topsoil mixes with the compost. Most who compost like to use this method in the fall without spading it in, so the waste remains as a winter mulch or cover. Then, in early spring, turn it into the ground.
The lazy method composters advise holding off spreading fertilizer until spring on sheet compost spread in the cold late fall.
They reason that if the nitrate or mixed fertilizer in early spring you will avoid leaching of the “fuel” chemicals.
The use of chemical fertilizer is essential unless the soil is very rich, to begin with. This is because virtually all compost contains cellulose-bearing materials and bacteria which to split and digest the cellulose requires lots of nitrogen.
If not added in sufficient supply, the bacteria robs the soil of nitrogen reducing the yield of the first crop where the compost is used. The reason? The nitrogen, although still there, is in a form unavailable to the plants. After the first season you won’t have to worry about it for there should be more total nitrogen than ever.
The bacterial activator is essential in sheet composting to encourage more rapid decomposition. The activator supplies more bacterial action than most soils can provide.
In both row and sheet composting, pulverized limestone for neutralization is usually essential. If you live in an alkaline soil region, it may not be needed. But, if the soil is acid, neutralizing is recommended. This encourages the right bacterial action and prevents further acidifying of the soil.
If no pulverized dolomitic limestone or other limestone (natural rock, mainly calcium carbonate with some magnesium carbonate) is available, you can use the faster-acting agricultural grade of hydrated lime or wood ashes (preferably from hard woods), rock phosphate, potash rock or gypsum.
The Compost Tumbler
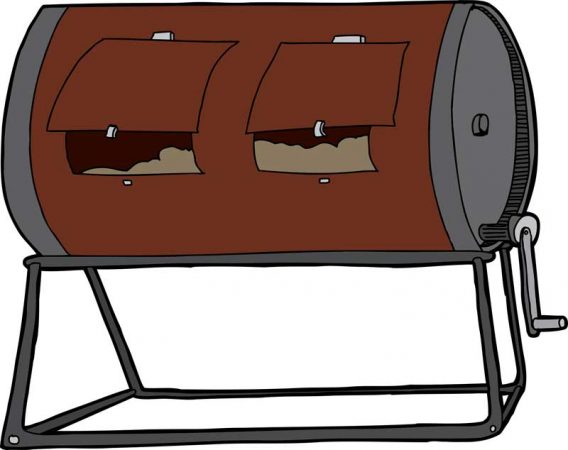
Another method of speeding compost-making is the use of compost tumbler. You can operate a tumbler composter with no odor in a basement or garage year round. I’ve seen it done.
Compost tumbler cabinets give semi-automatic aeration. These specially developed “machines” have proven superior to compost bins or piles.
Properly operated, they prevent the souring tendency possible in poorly aerated and drained bins or pile arrangements. Using this type of composter once decomposition starts, in three or four weeks, the operation is fairly continuous.
Purchase composting tumblers like this online or at local gardener supply stores.
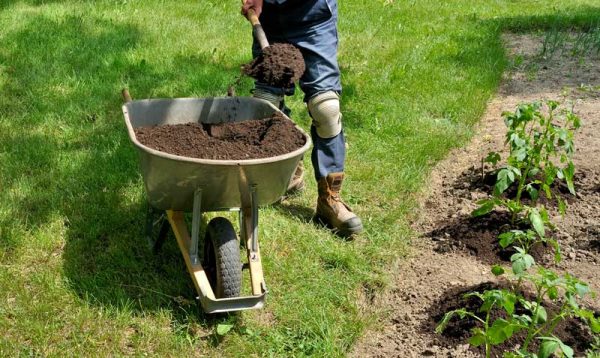
How To Use Compost
General Rules For Using Compost
- The more liberally you apply compost, the better your results will be.
- A two or even three-inch application on a given area each year is not too much, especially if your soil is poor to start with.
- It is best to apply half-rotted, fibrous compost in the fall. The structure and fertility of poor soil will show significant improvement if you incorporate large amounts of this compost 12 to 18 inches deep. Spread compost on the soil surface and work in with a rotary tiller to a depth of four to six inches.
- Composting material will continue decomposing through the winter. Some gardeners plant a green manure crop to add more nutrients and fertility for tilling under in the spring. Others leave a mulch of hay or similar material on top of the soil.
- Apply finished compost, which has is notably crumbly of a rich, dark color, a few weeks before planting time.
- Work compost through a half-inch screen, returning coarse pieces to the composting pile. Save the very fine material for use in seeding and potted plant mixtures.
- Mixed with topsoil, well-rotted compost is ideal for top-dressing and side-dressing growing plants. Used this way, composting material gradually supplies nutrients to the plant roots near the surface Compost also acts as a mulch to protect the soil from eroding rains and temperature extremes.
- Another method of supplementary feeding during the growing season is compost watering also known as compost tea. Many of the nutrients in compost are readily soluble.
- Fill a watering can half full of compost, add water and stir, and sprinkle all your plants liberally with the compost tea mixture. A cheesecloth bag of compost suspended in a barrel or similar container will also give you a rich, amber-colored solution for feeding all plants.
VIDEO: “How to gain complete energy independence”
How To Use Compost On The Lawn
A good compost, containing a liberal quantity of organic matter, is not only favorable for the multiplication of bacteria, which liberate plant food to grass, but also promotes aeration of the soil.
For a thick, deep-rooted lawn that defies crabgrass and drought, use plenty of compost both in making the lawn and maintaining it. When building a new lawn, thoroughly spread and mix a two-inch layer of compost and fertilizer into the top six inches of soil.
Do this early in the fall, using finished compost and sow the lawn in cool weather.
When starting your lawn in the spring, sow a temporary covering like Italian ryegrass. The grass will look neat until turned under in the fall. Then work in the compost and make a permanent lawn.
Renovate Old Patchy Turf:
- Dig out the bare spots about two inches deep
- Mix in ample finished compost
- Tamp down
- Water well before seeding
Adding Compost Top Dressing To Established Lawns
- Feed established lawn with compost regularly every spring and fall.
- Go over the grass with a spike-tooth aerator. The deeper the spikes, the better
- Spread compost put through a quarter-inch screen
- Rake the compost into the holes made by the aerator
- Water well
- Spread fertilizers, preferably slow-acting organic type, and water in at the same time.
Using Compost On Trees and Shrubs
For good growth of woody plants, soil building is a must. As the experts say,
“A $10 hole for a $1 plant” is the key to beautiful, healthy trees and shrubs.”
Dig the hole for planting two or three times the depth and diameter of the root ball. Use as a planting mixture of equal parts of topsoil, finished compost and peat moss or leaf mold.
Fill this in evenly all around the roots, tamping down each spadeful.
Spread two inches of compost on the top, out to the maximum reach of the branches. A mulch of peat moss, hay, ground corn cobs, buckwheat hulls or leaves over the compost will help keep the in the soil moisture and add more nutrients and humus as it decomposes.
Roses Thrive In Compost
Roses, by the way, thrive amazingly if copious amounts of compost. Use a compost soil ratio of two parts compost to one of soil in planting. Apply a six-inch mulch of hay or straw.
For regular maintenance of young trees and shrubs, spread several inches of compost each year, and mulch. Use pine-needle or oak-leaf compost for evergreens needing an acid soil, and mulch them with the same materials.
Always give the soil a thorough soaking before mulching, then soak the mulch well, too. Place stones on top of the mulch for a neat appearance. The cool, moist conditions under them encourage worms and other organisms that break down the organic matter and release its fertility.
To keep rodents from nesting near the trunk and damaging it, leave a bare space two feet from the trunk outwards.
This “ring” method is ideal for fruit trees as well as ornamentals, and for berry plants. Many an old, sickly fruit tree enjoy a vigorous, healthy new life by a heavy composting and mulching program, combined with judicious pruning.
Numerous home fruit-growers claim a reduction in their spray program when following such a program.
Another method of feeding older trees is to auger holes a foot deep and a few feet apart encircling the tree, and pack these with mature compost. Or you can push a fork into the soil at intervals, working it back and forth to crack the earth, then pour compost water or tea into the cracks.
Make Your Own Hillbilly Garden
Adding Compost To Flower Beds
Work in a four-inch layer of compost at least 18 inches deep in all new flower beds. If the soil is poor, use more. This will make it light, rich and crumbly, well-drained but moisture-retaining.
Your seeds will sprout better when using compost generously in planting. Bulbs, too, like a handful or two of compost in the bottom of the hole, covered with an inch of sand or soil.
Early in spring, lightly cultivate the top two or three inches of soil in your annual, perennial and bulb beds, and work in plenty of compost.
Then use finely screened compost, mixed with an equal amount of topsoil, as an inch-thick mulch when your plants come up. Feed every two weeks all season with a compost tea.
How To Use Compost In Vegetable Garden
Vegetables grow bigger and taste far more delicious when lavishly using compost in the vegetable garden for growing them. You’ll find disease and insect troubles greatly reduced as well.
For Luscious Vegetables:
- Dig in all the half-rotted garden compost you can get in the fall
- Work in finished compost two weeks before planting
- Use compost generously in the planting holes and furrows.
- When plants come up, mix ripe compost with soil and side-dress them heavily; repeat this in summer.
- As an alternative, mulch the rows with lots of semi-finished compost covered with raw compost materials such as hay, grass clippings and the like.
You can’t get too much compost, that comes from a large variety of organic materials to ensure a balance of nutrient elements. Vegetables grown in pure compost, have shown amazing results.
Starting Seeds
Compost put through a fine sieve and mixed with equal amounts of fine sand and soil is an excellent seed-sowing medium. Use coarser compost in the bottom of flats for good drainage. No fertilizer is necessary.
When seedlings develop their first true leaves, transplant them into a richer mixture, made up of half compost and half topsoil.
Use the same mixture when transplanting them outdoors, and give them frequent waterings with a dilute starter solution of compost tea to speed their early growth.
How To Use Compost For Potted Plants And Houseplants
NOTE: For houseplants I am more a fan of using commercial bagged soil mixes, using a simple mixture of peat moss and perlite or LECA.
The Reason?
Too many houseplants are overwatered. However, there are other reasons.
Below are some guidelines for those wanting to make soil for houseplants or potted plants grown outdoors.
- To ensure good water retention and aeration potted plants need a porous well-draining soil with good moisture or water-holding capacity
- Two parts of loam to one each of sand and crumbly compost makes a good general potting mixture.
- Double the amount of sand for cactus, and double the compost for humus-requiring plants like African violets.
- Use pine-needle or oak-leaf compost for acid-loving plants such as azaleas and gardenias.
- A biweekly feeding of weak composted tea is all the fertilizer most potted plants will ever require.
Most potted plants can use a repotting every year or two with a fresh soil-sand compost mixture. This includes plants in window and planter boxes.
Remove an inch or so of the old soil every spring and replace with a mixture of equal parts of fresh topsoil and compost. For vigorously growing or flowering plants, repeat this procedure in the summer.
The Application Of Compost
Compost making, does not require fancy garden equipment. But it is an essential garden tool. Just as in any garden operation, the right equipment goes a long way in helping you do the job easier and better.
There are many ways to make a compost heap or pile and some people prefer to make compost in a bin and still others like a compost tumbler.
The most important ingredient in making compost is the green garden or organic material which breaks down into humus. This you can’t buy – you have to gather it yourself.
A few examples of what you might use are: leaves, vegetable tops, weeds, grass clippings, hedge clippings, spent annuals, above-ground portions of spent perennials and even some of the material that usually goes into the garbage can.
Nature makes its own compost in the woods and we use this in the form of leaf mold. But, let’s face it. Nature takes a long time to break this material down. For our home garden, we want compost a little faster.
Guest post by Gary Antosh
![]()
Self-sufficiency and Preparedness solutions recommended for you:
BulletProof Home (A Prepper’s Guide in Safeguarding a Home)
Food for Freedom (If I want my family to survive, I need my own food reserve)
Survival System (Learn The 7 Secrets Every Family Must Know To Survive Any Disaster Or Crisis)
Backyard Liberty (Obama’s hidden agenda: more than just your guns…)