
Odds are we’re not going to have the luxury of machines to help us do the simple things like can our own meats and vegetables forever. So it makes sense to learn how to can your own meats and vegetables without a pressure canner now, instead of waiting until it’s too late to have the skill ready.
Which might cost you more than you think.
There are two schools of thought when it comes to this subject; “canning in the oven” and “canning in boiling water”.
We’re going to go over each method and give pros and cons to each one, but of course the first thing you need to start is cans, or jars. Luckily enough for you we’re going to go over that first as it’s the most important part of the whole article!
Best Jars & Lids For Canning
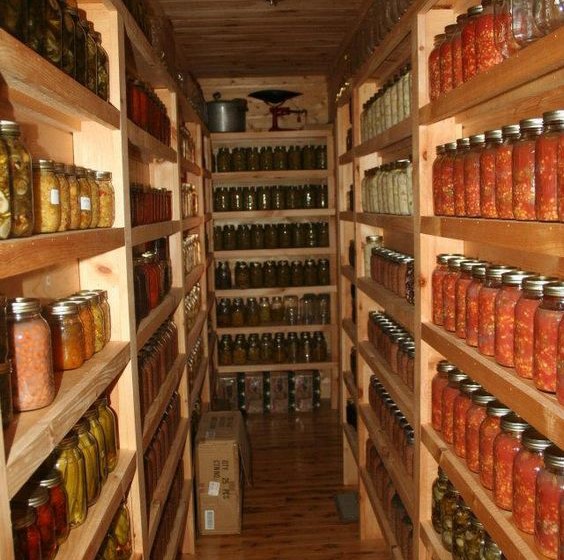
You literally can’t do this process if you skip this step, so let’s get the foundation right before we try to build the food pyramid on a thin foundation. There are two things to look at when selecting the perfect jar for canning, the size of your jar and the lid.
The best brands of jars you could use for canning are also the most common and well known, the kerr ball mason style jar. There are other designer brands of jars that are a bit more appealing to the eye, but we’re looking for efficiency not shelf appeal, right?
So go with a mason jar or kerr ball.
The size of the jar is up to you though, you can use a 16 oz. or 32 oz. depending on the amount of food you’re canning at the time. And some expert canners believe the size might affect the flavor, but we think that might be a bit of a stretch.
Next is the lid, you have the option of an all in one screw lid and a two piece flat lid with a thin metal gasket to seal with. Now there really isn’t any competition if you’re deciding which to use for the best and longest air tight seal. You want to go with the two piece flat metal and gasket lid.
Also Read: How to Make Jerky With and Without a Dehydrator
Canning With Boiling Water
Otherwise known as waterbath canning, this method was the original way canning was done, honestly it’s still the best and most reliable way. But since this method is from a bit more of a primitive time there are some dangers to doing it this way. First of all the safety of your hands, because it requires you to immerse the jars in boiling water multiple times and if you like your hands to be usable then you might want to invest in some equipment like a jar lifter.
To begin with canning with a water bath you’ll need to find the recipe you’d like that fits your needs and time. Next you’ll want to do a maintenance check on all of your equipment to make sure everything is solid and in working order. Make sure the lids are able to be sealed, the jars don’t have cracks or dried food if they’re being reused, and that your bath will have a consistent heat source for the foreseeable future.
Once all of this is in place you’re ready to begin!
Heat The Jars
For this step you want to make the water hot, but not boiling just yet. This is to make the glass flexible so that they won’t break when you add the hot food. You’ll want to fill the jars with hot water and place them into a stockpot that has been filled halfway with hot, but not boiling, water.
Bring the water to a simmer now and leave them until they’re ready for use.

Prepare Boiling Bath Water
Most kitchens will have a pot large enough to double as a boiling bath pot. all you really need is a large stew pot that can fit a few jars in it. If you want to get adventurous you can use a propane tank and a pot meant for crawfish or frying turkeys, these work great! The pot must be large enough to fully surround and immerse the jars in water by 1 to 2 inches and allow for the water to boil rapidly with the lid on.
You’ll want to fill the pot half way and bring to a simmer with the lid on until your jars are filled and ready to be placed in the pot. And don’t forget to line the bottom and sides of the pot with padding of some sort, a rag usually does the trick well. It’s just finding a way to get the rag to stay in place that can be difficult. If you don’t have the rag or some cussion the jars will likely break due to the heat and banging around.
Cook & Fill
Now that everything is in place to begin canning you can prepare the food you wish to can. Just follow your favorite recipe for jams, preserves, or meats and get it ready.
Once that’s done and ready to be put in jars you’ll take the hot jars out of the water using the jar lifters, remember not to grab too tightly or you could break the jars. Empty all the water out of the hot jars carefully, and then begin filling the jars with the recipe. Leave a quarter of an inch to a half inch of space between the filling and the lid.
If stated in the recipe, be sure to remove air bubbles with a rubber spatula by sliding the spatula between the jar and the food to release the air bubbles.
Smoking meat for long-term storage – Smoking secrets

Time To Boil!
If necessary clean the jars around where the lids will screw on, otherwise the lids won’t seal well at all. Use a damp cloth to do this. You’ll want to place the lid on the clean jar and apply the screw top with a tightness of just finger tip tight, too tight and you risk breaking the jar.
Once the filling has run out or you’ve run out of jars to fill it’s time to start boiling! You’ll use the jar lifters to carefully place them one at a time in the now boiling water, again cushioned by a rag or something to keep jars from breaking. Also remember the lids of the jars need to be covered by close to 2 inches of water.
Keep the full rolling boil going as long as the tested recipe says. Once the time is up, turn off the heat and allow the jars to sit for 5 minutes. This allows the water to cool down and the jars will be less fragile.
Remove & Test Seals
When taking the jars out of the pot you’ll want to place them on a soft towel, as the drastic temperature change could cause the jars to break. Then you’ll want to leave the jars undisturbed for 24 hours.
DON’T ATTEMPT TO RETIGHTEN ANYTHING. This could mess with the sealing process, just trust that it will work if you’ve followed the directions so far.
Test the jar lids for proper seals after the 24 hours. Lids should not flex up and down when center is pressed. Remove bands. Try to lift lids off with your fingertips. If the lid cannot be lifted off, the lid has a good seal. If a lid does not seal within 24 hours, the product can be immediately reprocessed or refrigerated. Clean mason jars and lids. Label and share then store in a cool, dry, dark place up to 1 year.
Recommended:
One Way to Make Aquaponics Easier
Canning In The Oven
Oven canning is likened to using a microwave to cook a meal, it gets the job done, but not the best way of getting the most quality. The basics of the steps are the same; however, the time is the main difference. And most good things take a bit more time as most of us know.
Heat The Jars
You’ll want to follow the same preparation for the jars as if you were still boiling in a bath. You will boil the jars in simmering water until you’re ready to use them. Except instead of having to prepare another bath of water to boil you just turn on the oven to 250 degrees when you put them in there!
Pretty easy, right? The Most Often Forgotten Survival Preparations
Prepare The Filling & Seal
While the jars are doing their thing in the simmering water bath, you’ll be preparing the stuff that you want to be canned. Whether that’s jams, jellies, or meats it’s up to you. Most anything is able to be canned either in a water bath or oven.
Set It… But Don’t Forget It
Once you’ve removed the jars from the simmering water, filled them, and cleaned them off you’re ready for the easiest part of this experience, putting them in the oven and turning it on! That’s really as simple as it gets.
So you’ll put the jars in the oven, turn it on to 250 degrees, once it reaches that temperature turn it off and let them sit for up to one hour. After that you can either carefully take them out of the oven and place them on a towel to avoid breaking, or just let them cool off in the oven overnight.
There You Have It
The two best ways to can food when you don’t have a pressure canner!
Obviously we have our favorites as I’m sure you’ve noticed, but it’s up to you to make your own decisions about what your schedule allows. We hope that this has helped to give you a push to get canning even if you don’t have an expensive pressure canner (survivethewild.net)!

Make sure you like our

Self-sufficiency and Preparedness solutions recommended for you:
Liberty Generator (How to gain complete energy independence)
Survival System (Learn The 7 Secrets Every Family Must Know To Survive Any Disaster Or Crisis)
Lightsoutusa (You will have communications in ANY TYPE of disaster.)
Stockpile Challenge (So what’s the recipe for “getting lucky” in the coming catastrophe?)
Food for Freedom (If I want my family to survive, I need my own food reserve)
Maybe I misunderstood, but I trust you aren’t suggesting that people water-bath meat and vegetables, are you?
This is an extremely dangerous practice and here’s why:
Boiling temperature is dependent on pressure; water boils at 212 degrees Fahrenheit at sea level and even less at higher elevations ( http://www.pewresearch.org/fact-tank/2015/09/14/does-waters-boiling-point-change-with-altitude-americans-arent-sure/. ) It will never get hotter. If you boil water for 1 minute, it will be 212 degrees. If you boil it for 20 minutes it will still be 212 degrees. The only way to get the water hotter is to apply more pressure; as if you were at the bottom of the ocean. This is the function of a pressure canner.
Most microbes that make food spoil are killed by around 200 degrees. The purpose of sealing the jar is to expel oxygen and prevent re-contamination. Botulism spores (and a few other bad dudes) aren’t killed until 270 degrees. And Bt actually thrives in the oxygen-free environment provided by a sealed canning jar.
The reason that it’s safe to water-bath fruits, jams, and pickled vegetables is that the high acid content from the fruit or vinegar prevents higher-temp poisons from surviving. No amount of boiling at any elevation will do that because the spores survived boiling and as soon as the product is back to room-temperature, they can multiply.
While it’s tempting to think that our great-grandparents did it this way and nobody died, that’s not typically true.
Canning was only invented about 200 years ago and has undergone so much trial- and-error refinement that canning as we now know it is only about 70 years old. Many elderly people I know (my parents included) have told me that , back in the infancy of home canning, they witnessed a few cases of paralysis, miscarriage or death from food poisoning due to water-bath canned vegetables or meats. I know someone from an area where this still occasionally happens. It doesn’t happen every single time, but I don’t want to be the exception…do you? And what if a product made like this killed a loved one? I know someone who badly sickened their whole family with a stuffed turkey that didn’t get to the right temperature. If the family member on chemo had eaten any, she would have died. That was was 20 years ago and she still gets the willies to even look at a turkey.
My parents grew up in rural areas during the Depression and really had to scramble to put food on the table and they still didn’t engage in this practice.
For meat, they made jerky, hunted/fished, kept animals, and bartered. For vegetables they kept a root cellar, and dehydrated or pickled them. That’s what mankind has done for the thousands of years before canning was invented to feed Napoleons armies.
While I typically view advice from federal agencies with a pretty jaundiced eye, I also accept the axiom that a broken clock is right twice a day…the USDA guidelines in The Ball Blue Book and elsewhere are correct. Don’t attempt to water-bath meats and vegetables.
It’s not worth the risk.
As a descendant of a long line of farmers, I grew up with grandmothers and aunts who home-canned everything, long before pressure canning. My mom taught me to can in the mid-80s, when we couldn’t afford the fancy new pressure canner. Then, my oldest brother invested in a large pressure canner and had fun canning homemade chili and wild game, home-raised chickens and even fresh caught fish (it all tastes like canned salmon,) for years. Our older relatives canned meat and veggies just as they canned fruits and soups. One of my favorite types of meat is canned beef (or pork). With six kids in Mom’s family, eight in Dad’s, several diabetics and an epileptic, no one ever got sick from tainted food. Perhaps that is because the women “hot packed” meats and veggies (pre-cooking them to kill contaminants before the canning process.) “Cold packing” is for fruits, and you put the raw, cleaned fruit in the cold jars and allow it to heat up in the pan.The most important part of canning is being careful to check and double check everything…. at least twice…. and toss out anything that you aren’t sure is safe.