
While stationed at Biggs Air Force Base (now defunct) in El Paso, Texas in 1963, I had the rare opportunity to be shown how to construct and use a “proper sling” by a 75 year old master whose heritage was Mescalero Apache. I never could properly pronounce this gentleman’s given name, but he preferred to be called Grandfather anyway as it was a term of respect.
The sling he removed from his pocket was somewhat worn and unimpressive to see which belied what he and it were truly capable of. Mentally I was comparing him with other slingers I’d seen. I’d become accustomed to observing wasted motion and inaccuracy as the norm. His calm demeanor and unhurried movements added to my misconceptions. After his first two casts, it began to register what I was actually seeing. This old dark-skinned gentleman transformed before my eyes to the embodiment of a trained hunter and a fearsome warrior. His strength and speed left me speechless.
At approximately 35 yards or less his accuracy was more than equal to the fictional Ayla*. He explained that after that distance the stone lost velocity rapidly which would make kills more difficult, but his accuracy seemed barely affected. His demonstration target was the bottom metal climbing rung on an old style telephone pole which he easily hit more than 80% of the time with such extreme speed and force that the stone would fracture into small pieces while the rung itself rang like a loud, dull sounding bell. He matter-of-factly claimed similar accuracy on moving targets. To the best of his knowledge, his Mescalaro tribe had been using slings for centuries for hunting or combat and could kill a deer or warrior with equal ease.
While he was growing up, before the turn of the 20th century, his tribe was restricted to a small area of reservation land so hunting was difficult at best. They were not permitted to legally possess firearms until the second decade of the 20th century, after having been forcibly disarmed in 1880 by an order from Col. Hatch of the U.S. Army. If they missed a throw, then they usually went hungry because the food the U.S. government dispensed was always too small in quantity and was frequently contaminated. He firmly maintained that his methods were the best and I could find no fault. The following text summarizes his instructions through actions and verbal communication.
 The Construction
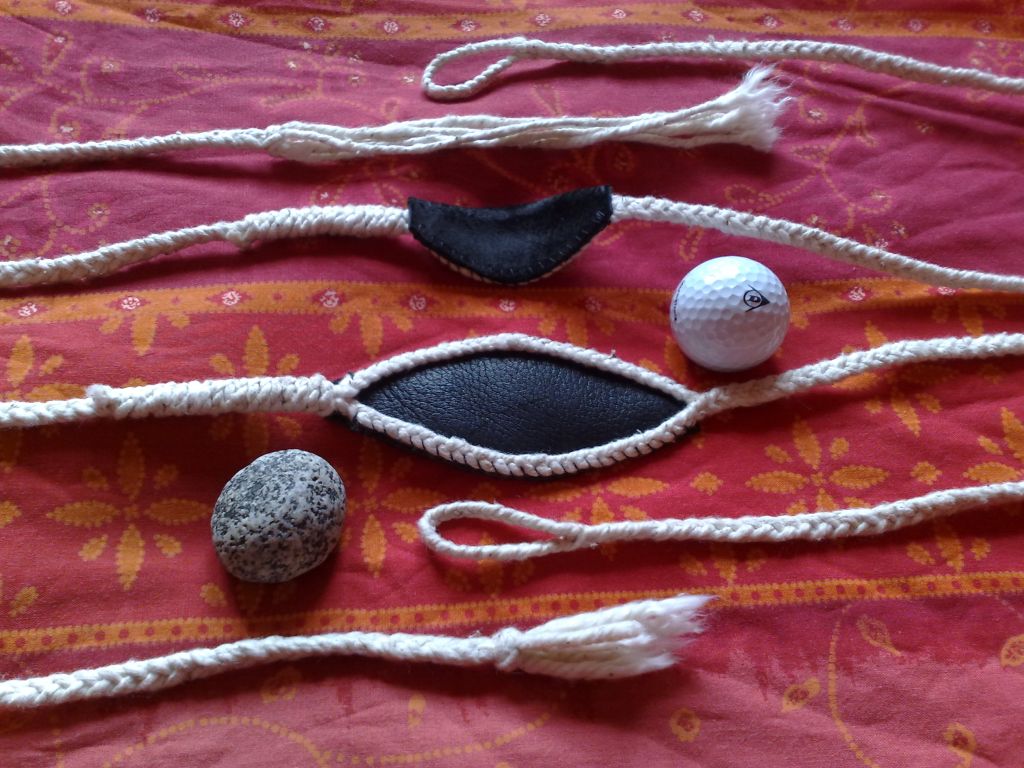
All slingers should construct their own sling to match their personal height and arm length. (A properly designed sling develops expertise, a poorly designed sling develops frustration – L.W.F.). The woven cordage should be made of a type of material that has little or no stretching properties because cord-stretch somewhat inhibits the stone and pouch velocity increase. As you’ll soon learn, the loaded-pouch speed must be able to increase very, very quickly. This requirement eliminates most leather and nylon type materials for the cords. Grandfather preferred modern string but you can just as effectively use your own plant fibers. Several types of braiding can be used but keep it tight, light, and simple to start with. This sling design will be small and light enough to carry at all times. Just wrap up the cord around two fingers and store it in the pouch to retain the pouch shape.
Start with three strong small diameter strings (strands) each 10 ft (3m) or more in length — at least twice as large and much stronger than kite string. Begin braiding from the center of the string with the ends hanging down from both sides of the braid equally. Make this starting braid (a single 3 strand braid) about 2″ (51 mm) long or just long enough to fit easily around your small finger at its base near the knuckle. then hang the braided portion over an anchored peg or the like and combine the six strings so you have three pairs and braid together to form the loop. From this point on, keep the cord taut. You now should have a braided loop with a single braided cord of 6 strings (3 pairs) attached. Continue to braid the single cord, frequently check its length by slipping the loop over your small finger. Lay the single braided cord across your palm, so as to grip the cord with your whole hand and thumb. Clamp the loose strings near the braid (to keep your braid from unraveling), let your sling arm hang straight down beside your body to measure the braid to the ground.

Continue to braid until the single cord reaches 2″(51mm) or more from the ground. Longer is not better! It’s worse if the completed pouch ends up too close to the ground. When finished, the loaded sling’s pouch should just clear the ground 1″ to 2″ with your arm held straight down. Allow more clearance if you frequently contend with grasses, etc.
Now, begin the pouch-split “Y” by dividing the braid into two separate cords of 3 single strands each. The two cords should be about 4-1/2″ (11.5 cm) long and precisely equal in length. Maybe 5-1/2″ (15.3cm) or more longer and 1/4″ (5.5 mm) wider on your next sling depending, of course, on the size of the rock you decide to use. The 4-1/2″ to 5-1/2″ pouch length will hold a 1-1/2″ (38mm) to 2″ (51mm) stone which, with skill, can kill up to a medium sized deer.
Now blend the two cords together again and return to the single larger diameter cord with the 3 paired-line braiding. Hook the “Y” split over your peg and continue until this cord is 6″ longer from the pouch-split than the looped end is. Knot the very end of this non-loop braid.
YOU MAY ALSO LIKE: Winter Projects For A Man’s Hands Self Defence – Fight or run
There doesn’t seem to be any better material for the pouch than tanned leather if for no other reason than its ability to be readily shaped. The leather thickness should not be too heavy but not as thin as rabbit skin, for the needed strength. The leather pouch should be the shape of an elongated “oval” with each end gradually tapering to a point. A good usable pouch width is 2-1/4″ (58 mm)wide. The leather should be long enough to fill the oval space between the two braided cords. If you use a larger piece of leather, you can sew it to the sling and trim it off later. Be sure to maintain a good pouch shape for the stone as you attach the leather to the cord by sewing with sinew or heavy shoe thread. Don’t pre-punch holes in the leather; simply pierce the leather with a large needle as you sew all the way around the pouch. Holes should be located in a line about 1/8″ from the edge of the leather and about 1/8″ apart. Before sewing, you may want to mark a stitching line to follow that is about 1/8″ from the edge of the pre-shaped pouch leather to use as a guide. This should keep the pouch leather from puckering. After gaining experience, you may alter any of the previous dimensions to suit your personal preferences and to match your physical capabilities.
The leather should end up slightly larger than the split opening. The 3-braid cords should lay on the outside of the pouch — opposite where the stone will sit. Fasten the pouch to the cord by passing the thread around the cord and then poking a new hole. Once you’re satisfied with the results of wet-shaping the leather to obtain a shallow cup, let it dry over a period of days with a stone slightly larger than what you plan to use loosely wrapped inside. Later finish by coating with leather sealant (anything from rendered fat to silicones) for moisture proofing and to make it pliable.
Put the loop over your small finger and lay both ends of the finished braided cord side by side across your palm with the knotted (non-loop) end hanging over the base of your hand and the pouch end of both cords passing through the thumb and forefinger. Grip both cords firmly with all four fingers and thumb. Holding the cords taut, slide-adjust the knotted end in your grip so the points on the pouch line up exactly when it is folded in half lengthwise.

Make a mark on the knotted (non-loop) cord just inside your grip where the thumb clamps it tight on the forefinger. Mark this location permanently by wrapping and interweaving a single string tightly around the cord. Wrap it many times to form a thumb-knot so you’ll grip this cord in the same place each time it’s used. This aids both consistent grip placement and accurate release timing. When finished, cut off the knot on the non-loop end and tie a new knot just 1″ (25.4mm) or so past your closed hand and trim off the excess.
One key to accuracy: do not try to make the pouch fit around the stone too tightly or it may not release reliably. If you find your accuracy mysteriously drops after considerable use — try changing and then reshape a new pouch leather. The more slings you make, the better the quality will get. Keep your first sling as a “good medicine” piece and/or reference to see how much you improve.
Ammunition
All stones of equal size are not necessarily the same density (weight). A smaller stone of greater density is faster for a longer distance than a larger stone of less density. large and very small stones, by their very nature, are usually less accurate, but use what you prefer as long as they work. Be selective and gain skill in locating the stones most equal to your favorites, it should help improve your accuracy.
Find a not too large, very hard and dense keeper stone (small hammer stone) to use in striking potential ammo stones (rocks talk). With time the resulting sound and vibration can tell you much about other stones, things such as density and imperfections, etc. Keep track visually of your more successful stones for retrieval purposes. Mark them with a small paint marker or crayon for both visual and sound comparison to others you find.
Once you have become a “stone connoisseur” it will be obvious that almost no stone is round. However, there are almost always similarities within stone shapes that can be utilized to improve accuracy. The similarities that are difficult to see, can often be felt in the hand. From the very beginning you should use the non-throwing hand to feel the stone shape and weight since that is the hand you will use to correctly place the stone in the pouch. By placing those similar landmarks (such as a small end or flat spot) in the pouch the same direction each time, the trajectories can be calculated to make very fine compensations in direction for precise aiming.
Once you’ve passed that magical unseen threshold of precision you should have already discovered not to switch back and forth between manufactured ammo and nature’s gifts (stones). Pre-made ammunition eliminates one of the great advantages of the sling, free ammo. (With pre-made ammo, unless you are very, very good, you may have to carry a lot of heavy weight when hunting or you’ll need to recover most everything you throw. L.W.F.)
The Logic
- When in throwing range of wild game or an enemy, it is unlikely they will stay still while a two-legged predator stands and twirls a weapon in circles. The prey will likely be long-gone or the enemy may shoot long before any projectile can be slung.
- When you wound a predator with a bullet or arrow, it doesn’t usually carry a personal risk factor, but missing a fatal spot with a rock can merely anger some predators (personal experience), so keep at least a good size knife and first-aid kit handy.
- When asked about the David & Goliath technique, Grandfather would smile and say that “the more times you spin the sling, the more you increase your chances of missing, even on a non-moving target.”
- A taller person can use a longer sling for greater speed but they are a bigger target for game to spot or for an enemy to hit (Grandfather stood about 5’7″).
- The necessity for speed when using a sling is absolute but it only comes with practice.
The Technique
Target practice should be approached with an attitude of the hunter. You never know when it might be needed for that purpose and it makes practice more interesting. (To those of you who have practiced by twirling the sling, this Apache method may seem like a very short anti-climax but please give it an honest try. L.W.F.). For the purpose of hunting, practice while standing on uneven ground and from behind partial cover. While hunting, after you’ve stalked within range (or placed yourself in front of a target while practicing), stand very still while facing your prey with your body at an angle of about 45 or more degrees. Pick an open spot to throw from. You should have previously removed any backpack, gloves, wide-brim hat or heavy coat that is restrictive. Keep the throwing arm side of your body to the rear, hidden from the target’s line of sight. Hold your visible arm close to you, across your body. The animal is not necessarily sure you are a human predator until you show your arms. Don’t stare directly at the animal until you are ready to aim and throw.

If you have not already loaded the stone, do it now by keeping the sling behind you (out of sight from your prey) with the cords gripped about 2″ from the pouch. Insert the stone in the pouch (behind you) and slowly let both cords slide through your hand (behind you) until the pouch stops just above the ground. Quickly concentrate visually on the smallest kill spot possible.
Without hesitation and without moving a step, very quickly swing your arm and sling up from behind you and over the top in an overhand throw while attempting to keep your arm as straight and long as you can for airspeed. Put your body fully behind it in a fast turning motion similar to a baseball pitcher but without the step. Be aggressive and make all motions as large as you can. It’s usually harder to correct a bad habit than to learn it right the first time. You may try a forward step as you throw but I believe you’ll find that it slows you down. The body motion requires more twisting than an Atlatl or Tomahawk throw.
The whole action is over from start to stop in less than a second and the arm has swung less than 360 degrees. If your muscles are not used to this motion, start slow and work up to speed over a period of time. Speed and accuracy will only come with daily practice and everyone, male and female is a potential master.
I hope these condensed instructions are of help. Good luck and pleasant throwing.
– L.W. Forsyth
* Ayla is a character from Jean Auel’s Earth Children books
Source: slinging.org
Self-sufficiency and Preparedness solutions recommended for you:
The Lost Ways (The vital self-sufficiency lessons our great grand-fathers left us)
Food for Freedom (If I want my family to survive, I need my own food reserve)
Survival MD (Knowledge to survive any medical crisis situation)
Liberty Generator (How to gain complete energy independence)
Backyard Liberty (Obama’s hidden agenda: more than just your guns…)
Alive After the Fall (Build yourself the only unlimited water source you’ll ever need)
The Lost ways (4 Important Forgotten Skills used by our Ancestors that can help you in any crises)
The Patriot Privacy Kit (Secure your privacy in just 10 simple steps)
BulletProof Home (A Prepper’s Guide in Safeguarding a Home )
Lightsoutusa (You will have communications in ANY TYPE of disaster.)
Blackout USA (EMP survival and preparedness guide)
Survive The End Days (Biggest Cover Up Of Our President)
Survival System (Learn The 7 Secrets Every Family Must Know To Survive Any Disaster Or Crisis Situation)