
I’ve put in some time lately to thinking about stoves and fireplaces. Thinking back I realized that I’d never seen an efficient permanent fireplace setup in any campground. The problem with the fireplaces is that they were built to work with dry split wood – which is getting harder to find. Dry split wood burns easily creating its own draft whereas wet wood needs a directed draft to make it both dry out and burn efficiently.
Generally around here the fireplace is a piece of steel culvert hammered into a suitable piece of ground to keep the campers from burning the place down. Somewhere between 6″ and a foot is left above ground to hold the fire. Fires burn well when you get everything hot, but it can be time consuming to get a fire that hot with damp or poor wood – since the air draft is poor. In addition the leaving party has to wet down the fire ashes by law so the next person along has a wet mess to build a fire on. This leads to many making their own fireplace, often in a poor location or with dangerous materials such as rocks from the river. Where permanent fireplaces are made from brick they suffer the same air flow problems.
I’d guess that many people here – like myself – really haven’t put much thought into permanent fireplaces or stoves. Usually I only use the forestry campsites in the spring and fall when the tourists are elsewhere – and at those times I gather some decent wood on the way. I just need enough to brew a pot of coffee for an hour’s relaxation before getting back to work. The thing that has made me think of improved campfire setups and stoves is that I see that the campsites are getting wrecked by people searching for wood that will burn. At the same time there’s usually lots of junkwood lying around like damp cottonwood that no-one can get started – and the usual knotty spruce and hemlock that no-one’s been successful at splitting – and I carry a maul and wedge to help reduce that. So it would be great if we had setups so that junk wood could be used successfully. In the wetter times of year It takes a while to get a decent fire going no matter where I am so ideas that might speed up the process are welcome.
Read: The Dakota Fire Hole
I noticed last summer that lots of people had used coffee can stoves and left them at campsites. Puzzled me for a while since they had hardly been used. I finally guessed they were made for smudges to keep off flies in the evening. In their simplest form they are just cans of various sizes with holes punched around the outside curve of the base to let in air. You just scoop in some coals from your campfire and then throw in a few leaves occasionally to make a light smoke. Portable for when the wind changes – slick. I had usually built small fires which is a lot more mess to leave behind. Even if you do clean up the ashes you leave blackened areas.
I was thinking about the whole stove/campfire thing yesterday and reasoned that if you designed such a stove a bit more carefully, you could get more of an air draft to get a real roaring fire in such a stove, even with damp twigs. Nothing is new, and I’m sure that most of the designs have been tried. Anyway an efficient can stove is the first step to an efficient fireplace!
Then again you could follow the philosophy of a stove that directs heat and uses less fuel – very important for third world countries: Jiko
There have been posts in the past on Bladeforums about the Kelly stove where a water jacket surrounds the burning chamber to heat water fast for tea or coffee. I’ve no doubt now that this really works – but I bet you get a lot of creosote around the burning chamber if you don’t burn really dry wood. The water jacket would make this certain. (4 Essential Camping Tips from a Green Beret)
Stove Adventures..
If you look at a few of the designs for simple stoves, you are likely to laugh. Some even have batteries and fans! Since the main object is to increase directed air flow you soon stop laughing though. I’ve no doubt those designs work well, but I’m of a simpler nature. OK! OK! Of course I’m going to try them – who could resist? Certainly not this nerd with boxes of computer fans!
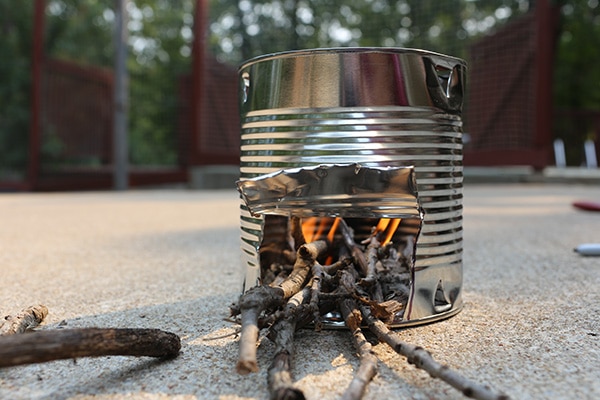
Anyway off I went to the beach yesterday with two designs. The simplest was a tall can with holes punched around the outside of the base with a punch. The second was my highly engineered marvel. I simply made holes around the base of the can with a church key can opener, then drilled holes in the centre of the base of a second can – then cut it out with a can opener and dropped it inside the first can. It rests on three sheet metal screws. Now you have a can stove with a pretty solid cool base, as the pictures show.


Both worked much better than I expected. I started a small fire in each with a handful of paper from a shredder and some cedar fuzz sticks then just dumped in small diameter (1/8″) driftwood right off the ground. The stuff was just dry enough to break, but was definitely damp. I had enough heat from the fires in both cans in five minutes to add just about anything and have it burn. The design with holes in the centre of the base clearly worked better in that less time was spent with the fire smoking: it went to peak efficiency and clean burning very quickly. I had thought that ash would reduce the effectiveness of the design with holes in the centre of the base – but it actually worked better as ash built up – probably due to the fact that the air coming through the ash was heated.
Apparently experiments to design cheap simple stoves have shown that the main problem is heat lost through the sides of the stove – as much as 50%. This leads to fuel in the stove not being dried enough and further efficiency being lost to incomplete combustion. The next design is simply a smaller can bolted inside a larger one with air holes drilled in the base of both. The concept is to fill the space between the sides of the cans with sand to keep the heat in. I doubt that this would be needed with any type of reasonable fuel, but I want to see just how far one can take a stove in burning poor fuel. It’s just a Jiko – nothing new here. I tried my first model today with varied success. The good news is that damp pencil size sticks worked and the fire just kept going. The bad news was that I hadn’t put enough air holes in the base and it worked at less than peak efficiency. I also had only wet sand to fill between the can walls. It took a while to dry this and get things really going.
The Basics:
- This stuff is fun to play with! You learn lots about fires and airflow while you are working. All you need is a can, a drill or punch and maybe a can opener and pop rivet set for more complex designs.
- You need a can or cans with a height at least equal to the diameter. The more height you have for the same diameter the more air draft – but then stability becomes an issue.
- Holes in the base work better than holes punched out of the sides. By the time you have drilled all the holes you need, you’ll have drilled out more than half the area of the base. Most of the holes should be toward the centre.
- You start with a few shavings which typically will go well due to air draft. Then the finer you break the stuff you add the faster you will go to peak efficiency. Smashing twigs with a rock works fine as length is no concern.
- You will see that you can add fuel to your initial starter that would never work with an open fire. Once it really gets going you can add anything that will burn.
- Wind really helps. Let a few large sticks hang out over top to cause turbulence and reduce air pressure to suck air through tube.
The Scheme Of Things..
There really is something aesthically unpleasing about sitting around a coffee can instead of an open fire. The whole concept is a cooking device that works with high efficiency – instead of an open fire that warms you and looks good while it’s doing the cooking thing. It was humorous to wonder if I’d begun the thin end of a wedge that would end up with me doing something bizarre like using a high tech camping gear. I guess though that I have to think about site impact – even up here…. It felt pretty good to leave my spot on the beach today leaving almost no trace of being there. There were other people with fires since the snow is keeping them out of the bush, so already the beach shows a lot of sign of use. Naturally none of us used the permanent fireplaces! Since the stoves are highly efficient, all ashes are totally burned out within ten minutes of the last feeding of the fire. Another five minutes suffices to cool to the point where they can be put into a garbage can. Then you pick up your stove and go leaving no trace.
Other than having fun with neat free stoves I have come away from this with a few ideas. I often frequent the same places in a given year, since I like to see the daily changes in a creek, river or lake. In summer it is easy to build fires from driftwood which burn to few ashes. I leave just enough burning to discourage bugs, and just build up to heat coffee. In spring especially though I use a lot of wood since everything is damp. The first half hour’s burn is just to build up a bed of ashes to dry the wood that will be the main cooking fire. That’s a lot of wasted wood over a season. I can see that forestry campsites where people build fires in a wet firepit have the same problem on a larger scale. It’ll be interesting to see if I can build a permanent fireplace setup that work at higher efficiency. It shouldn’t be a problem running some metal pipe underground to supply an updraft in a piece of buried culvert, and lining the culvert with some of the fireable clay we have around here. It’ll just be a buried Jiko. For all intents and purposes it will look like a regular fire and fireplace, and closing of the air pipes will convert it to such to preserve heat in ashes.
This week I’ve been busy with my stoves and building regular fires at the same time to judge effectiveness. It’s still winter here with snow on the beach and dampness from a waterfall. The bottom line is that stoves do work well if you want something fast for cooking and want to use damp whole sticks the size of a pencil or less. These just don’t burn well on a regular fire unless you have a lot of heat. Splitting up arm sized sticks with a hatchet soon provided an equal open fire. I guess the bottom line is that with a hatchet or axe along, such splitting is trivial and the stove isn’t really necessary except for site impact. A leuko and baton took a bit more time to split wood but not too much. Working just on a small piece of ground above high water line – and not cheating by going uphill into the bush to gather dead lower connifer branches – only arm sized pieces of wood were dry enough inside to use on an open fire. Pieces were split to pencil size.
Post by John Miler
![]()
Self-sufficiency and Preparedness solutions recommended for you:
Liberty Generator (How to gain complete energy independence)
Backyard Liberty (Obama’s hidden agenda: more than just your guns…)
Food for Freedom (If I want my family to survive, I need my own food reserve)