
Every year when we got our deer, I’d take them to the local butcher. Butchering seemed like something beyond our ability — something that was best left to the butcher. Only with the price of butchering going up, I made the decision that the next deer we harvested we’d butcher it ourselves.
Honestly, I was a little nervous at first but it’s really not that big of a deal to cut your own steak. It’s actually pretty satisfying.
How to Butcher Your Own Meat
Butchering is a skill that takes time to develop so we obviously can’t cover everything you need to know in one blog post. Below are the basics to help you get started.
Tools for the Job
What you’ll need are good hunting knives and saws for cutting through bone. We have two different types of saws that we carry out in the field. One is a smallish saw called a Forest Pioneer Portable Folding Handsaw that we use to cut through the rib cage and the pelvis. Another is a Takedown Game Processing Saw that we use for quartering. You don’t have to get those particular brands, but they do make the job a lot easier. If you can, a big survival knife like a Bowie knife will also be helpful for cutting through big cuts. Beyond that, you don’t need anything else, but we decided a boning knife would work well.
The other things you’ll need is plastic wrap, freezer paper, tape, and a pen.
Also read: Which Foods Have the Longest Shelf Life? Pantry Stockpiling Tips You Need
Get the Heat Out
When we shot our last buck, we knew we’d need to field dress and skin the animal before even considering butchering it. When dealing with a freshly shot animal, the first rule is to get as much heat out of the carcass as possible. That requires skinning and field dressing.
The reason for getting the heat out is to prevent the meat from spoiling. A deer’s body heat can destroy the meat quickly, which is why most hunters do this out in the field. The other reason is that the deer’s stomachs will start to fill with gas and bloat the animal. If you don’t get the organs out, you’ll have a mess on your hands in the form of stomach contents all over your meat. And that will make the meat taste awful.
Field Dressing and Skinning
There are many ways to field dress and skin. We usually start above the breastbone in the neck and make a slit down the middle of the animal all the way to the anus. You’ll need to cut through the ribs where they meet the breastbone on one side, and you’ll need to cut through the pelvis bone so that you can quarter the animal. Spread apart the chest and the pelvis so that you can get the organs out. You’ll want to find the trachea and cut it at the top and then start removing the connective tissue around the organs. Eventually, you’ll pull the entire goopy mess of organs out and remove all of them including the intestine.
At this point, you need to wash out the cavity with cold water. After you do that, look for the tenderloins on the inside of the lower back. They’re two strips of meat on either side of the spine. Cut them out carefully and bag them for refrigeration. These are the most tender part of the deer.
Next, you need to skin the deer. Many people hang the deer and carefully remove the skin for later tanning. After you get your deer skinned you can start butchering and quartering.
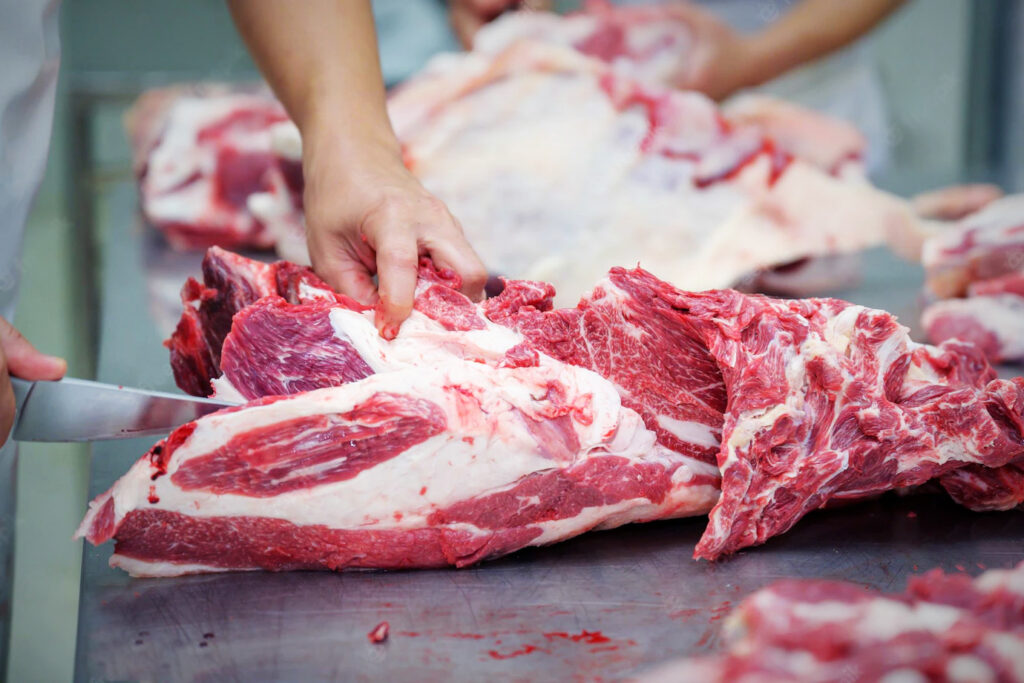
Butchering Your Meat
At this stage, it’s important to have a guide. There are many good guides with pictures in books and on the Internet that show you how to cut up your deer into recognizable pieces. We started first by removing the backstraps, which is the meat along the deer’s back on either side of the spine. This is the second most tender meat.
If you haven’t caped your deer, remove as much neck meat as you can for roasts, stew, or for grinding into hamburger or sausage.
Removing the Legs and Quartering
You’ll need to remove the lower part of the legs which have no meat per se. The best way to do it is run your knife around the joint, severing the tendons. Then, you can snap the legs off by twisting them at an odd angle.
Quartering the front legs just require you to follow the shoulder with your knife and snap the joint. The rear legs need a saw to cut each haunch from the pelvis. Once you have the four cut off, the rest of the deer meat should be cut from the back and ribs for grinding into hamburger or sausage.
Cutting Roasts and Steaks
This is where a guide will serve you well. As you cut the pieces from the bone, you’ll want to follow the cuts as your butcher would cut them. As you cut, you’ll want someone to rinse the meat with water and then wrap the meat in plastic and then with freezer paper, like a holiday present. Package and write the cut on the package with the date and pop it into the freezer. Yes, it’s that easy.
It Gets Easier
As a beginner, this process will probably take a while and you’ll not have as good of cuts initially. However, the more you butcher your own meat, the faster it will be and the better cuts you’ll get. Eventually you may find yourself as more of a meat artist than a butcher.
Post by John Miler
![]()
Self-sufficiency and Preparedness solutions recommended for you:
BulletProof Home (A Prepper’s Guide in Safeguarding a Home)
The Lost Super Foods (126+ Survival Foods and Tips for Your Stockpile)
Alive After the Fall (Build yourself the only unlimited water source you’ll ever need)